Zenton's Crack me for beginners: An Easy Game
In this blog, I'll attempt to reverse-engineer the Zenton's crackme challenge hosted on crackmes.one in detail.
 Load the binary in IDA and start the challenge
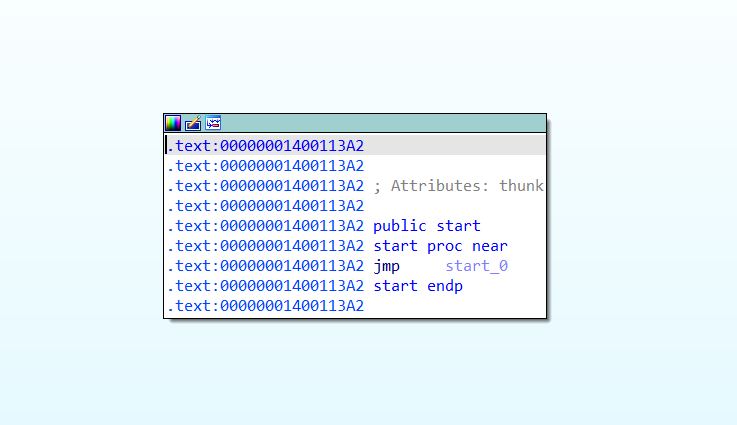
When I loaded the binary into IDA, it greeted me with a jump to start_0. Naturally, I followed it because let’s be real, who doesn’t want to know where the rabbit hole leads?
 Two unknown calls
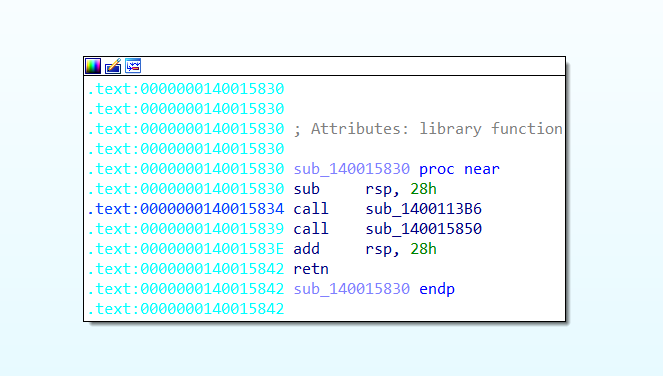
After landing, I found two calls. Without overthinking it, I opened the first one.
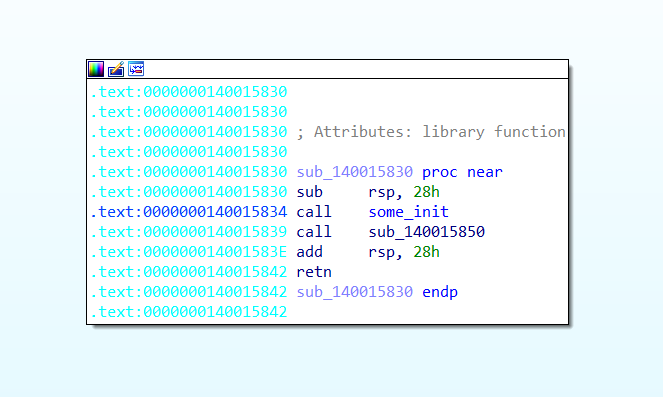 We name the first call as ‘some_init’ cause it’s only doing pre-setup, i.e, initialization’
Inside was a maze of initialization routines, so I named it some_init and backed out faster than you would from a 1,000-line switch statement. Then I went into the second call.
 Second call disassembly
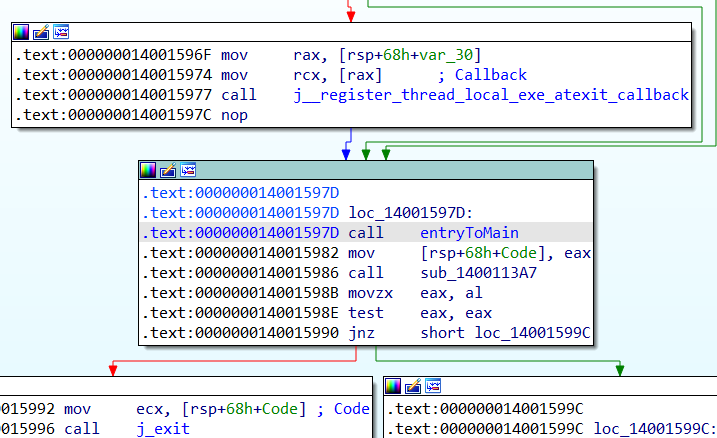
Entered the second call routine. And for those who may be wondering why I named the call to some function as entryToMain, just read further. All your prayers will be answered.
Now this second call was also a mess of initializations but had a familiar feel (Deja-vu). It reminded me of that wrapper function responsible for setting up the main call.
A quick peek-a-boo through the disassembly confirmed it, there was this familiar pattern: a call to main sitting near a call to exit.
That’s a classic compiler move.
 A C++ program I compiled for reference which confirms my assumptions
For those who have analyzed binaries before, you know that main often lurks near a call to exit.
To make sure I wasn’t imagining things, I referenced a small C++ program I compiled ( can be seen in image above ), and the setup was identical.
With my confidence boosted, I named the function entryToMain and jumped in.
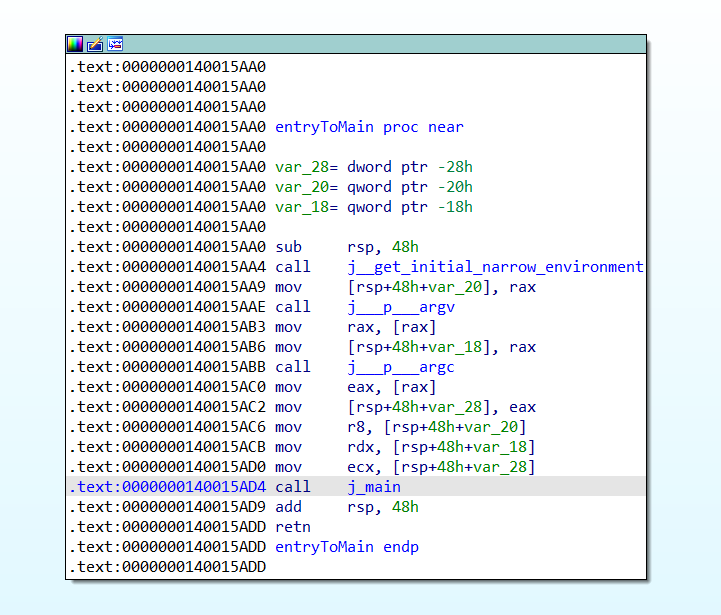 We jump and get to this function, does it seem similar ? See the C++ reference program i compiled. Yes, you can see it, the arguments ! This is a setup function which calls main
Inside, I found the holy trinity of mov instructions:
ecxforargc,rdxforargv,r8forenvp.
And these are the arguments for the call to main. You ask why, it’s because the definition of main function in a typical C/C++ program looks like this:
int main(int argc, char *argv[], char *envp[])
argc:
This is an integer (int) that represents the count of command-line arguments. On a 64-bit system, the size of int is 4 bytes. This is why the ecx register (a 32-bit register within the lower 32 bits of the 64-bit rcx register) is used to pass it.
argv:
This is a pointer to an array of pointers to char (i.e., char *argv[]). On a 64-bit system, a pointer is 8 bytes. Therefore, the rdx register (which is 64-bit, accommodating 8 bytes) is used to pass it.
envp:
This is also a pointer, specifically to an array of pointers to char (i.e., char *envp[]). Similar to argv, since it’s a pointer, its size is 8 bytes on a 64-bit system. As such, another 64-bit register (like r8) is typically used to pass this value.
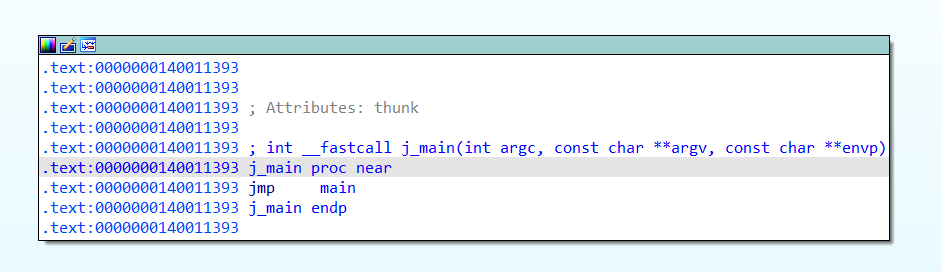
Having all this learned, now we should see a call to main ( which I named it as j_main, reasons explained below ). We follow it and see an another jmp which led me to the actual main function. So it led me to believe it was a jump thunk. That’s why the j_ prefix.
For those unfamiliar, a jump thunk is like a middleman that redirects calls to the actual implementation of a function. These are commonly used in dynamic linking. Also, you can tell it’s a jump thunk or not by looking at the function name, if it starts with prefix j_ then it’s a jump thunk.
And Now, for those who are unfamiliar with dynamic linking, yess, we don’t leave any person with doubts.
Dynamic linking is like your program outsourcing its chores. Instead of stuffing all the code into the executable, it says, “Hey DLLs, you should handle this!” It’s at runtime, the dynamic linker kicks in like an exam coordinator ( always make me sit in front seat ) and figures out where the actual code lives and how to connect to it.
Benefits:
- Smaller executables, since shared libraries (DLLs) handle common tasks for multiple programs.
- Updating libraries doesn’t mean recompiling your whole program—just fix the library and you’re good to go.
Downsides:
- If the library has a bug, every program using it gets to share the misery. But hey, one fix updates them all. Efficiency, right?
Let’s get back now, and jump to j_main.
 Yes, we found the jump to real main
And yes it’s contains the jump to real main, I named it main. And followed it.
 Main function disassembly
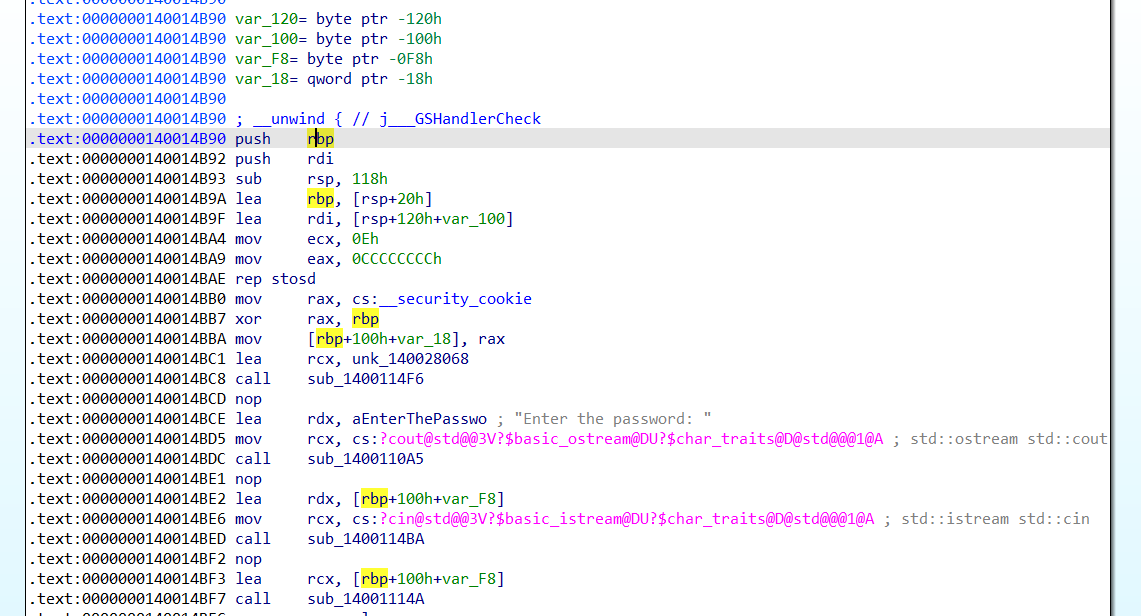
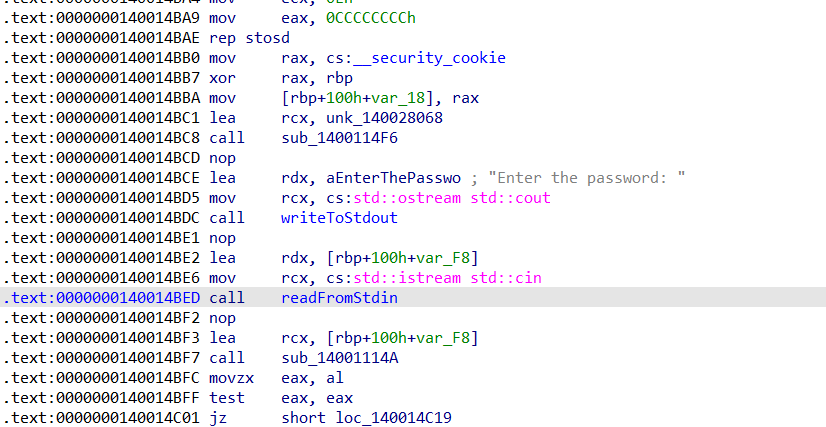
Now things started to get interesting. Hardcoded strings like “Enter the password:” are always a good sign, it means we’re getting close. But before digging in, I cleaned up the mangled C++ names in IDA (Options > General > Demangled Names > Names).
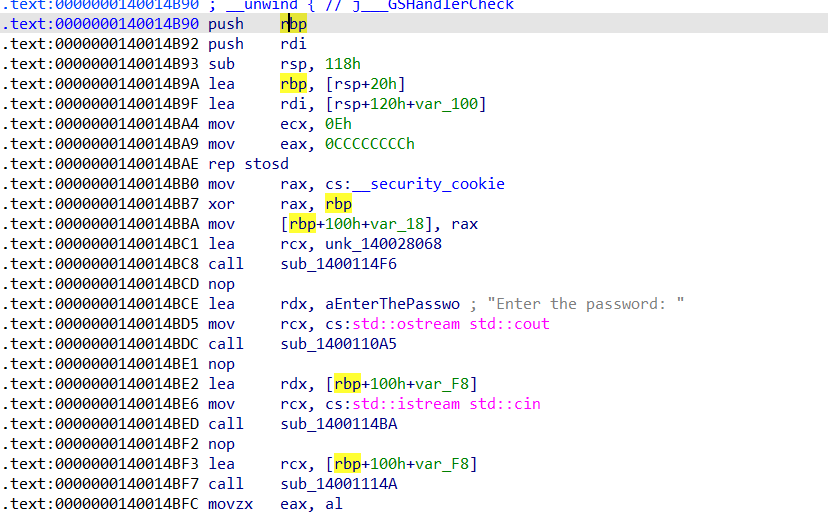 Demangled the symbol names
Much better. Next, I noticed some initialization routines. The binary was using rep stosd, which is basically setting up C++ constructors and objects. Nothing juicy here, just the usual setup work done by the runtime.
Then came the std::cout and std::cin. We see their addresses being moving into rcx followed by a call. So, if you’ve ever written C++, you know, these are used for printing to and reading from the console, much like printf and scanf in C.
 Renamed the writing and reading functions
The function calls followed by them were responsible for handling standard output and input as we put the address of those handles into rcx which is used for passing first argument to a function call in x64 __fastcall calling convention, so I renamed them as writeToStdout and readFromStdin.
After this, we encounter a lea instruction, which stands for “load effective address.” This instruction loads the address of the calculated value stored at [rbp + 100h + var_F8]. This value is then placed into rcx, which will be passed as an argument to the upcoming function call is sub_14001114A.
Before moving on, what do you think the argument is ? Guess it.
Take a 10 second pause ? And then Click !
It's actually an array. How did I know ? Simple: the trusty 'lea' instruction gave it away. An array is actually passed by reference and that's the same thing we are doing here, passing address of array stored in rcx to the function call. Validation function returns an integer which is checked afterwards
Before we move forward, I decided to name this function validation. Why? Because when I peeked ahead at few of the next instructions, it became pretty obvious this function was handling the core logic.
Just look at this beauty: the test and jz instructions. These set the stage for some juicy branching.
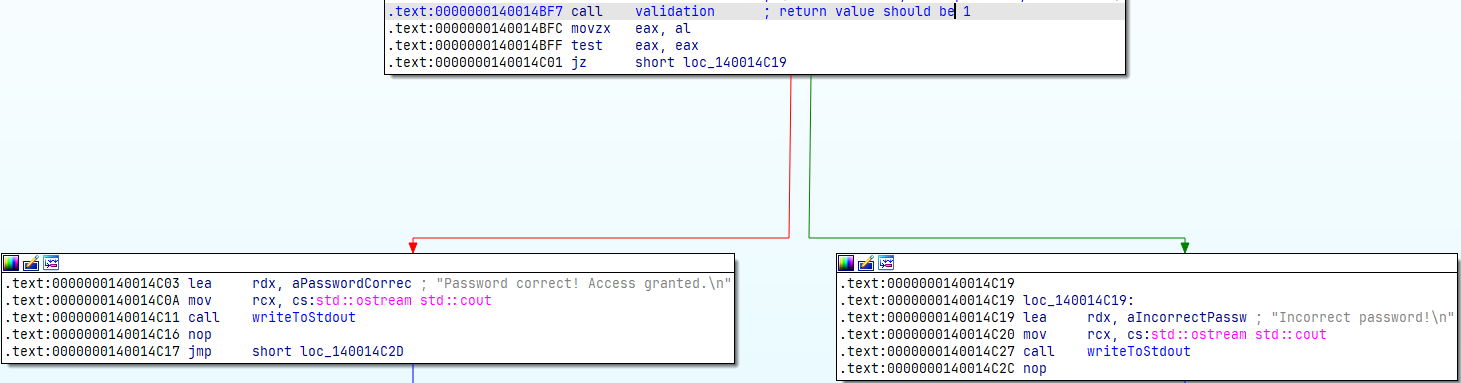 Jump flow after the call, one leads to correct path whereas other leads to the incorrect path
The left one leads to the “correct path,” but here’s the catch: for that path to be taken, we need the validation function to return a value other than zero in rax.
Why? Because jz (jump if zero) only jumps when the Zero Flag (ZF) is set, which happens when test eax, eax (it performs an AND bitwise operation) results in zero.
The Green line flow means, evaluation of previous instruction resulted in True.
The Red line flow means, evaluation of previous instruction resulted in False.
So, to get to the left branch, we definitely need a non-zero return value from the validation function.
Now let’s get into the validation function itself, this is where the dark magic happens.
 The validation function where the magic happens
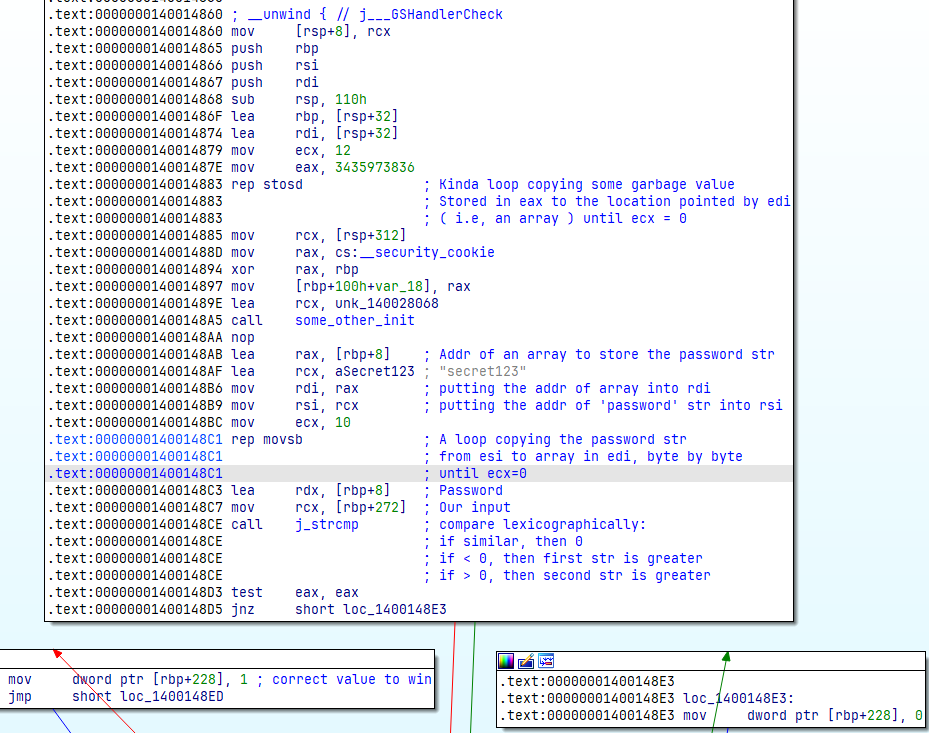
Hehe ! I changed the font out of temptation xD. JetBrains Supremacy !
I will try to explain as concise as possible what’s happening here:
First we load the address of an local array from [rbp+8] into rax. How did I know it’s an array? Again, the trusty lea instruction pointing to a reference. Classic.
Next, we load the address of some mysterious string (turns out it’s the password, but more on that later) into rcx. Let’s just pretend we have no idea what the string means yet, but I’m about to find out.
We then put the address of the array into rdi (the destination register), and the address of the string into rsi (the source register). In assembler lingo, these registers are used for moving, storing, and comparing stuff.
Now comes the fun part. We load 10 into ecx, which will be our counter. Then, we run the infamous rep movsb. Here’s how that works:
- rep is a prefix that means “repeat until
ecxbecomes zero,” - movsb stands for “move string byte,” meaning it copies bytes from
rsi(source) tordi(destination). Without rep, it moves one byte. With rep, it’ll move 10 bytes. Pretty neat, right?
Didn’t understand it ? So it’s basically C’s memcpy.
void memcpy(void *to, const void *from, size_t numBytes);
After that, we load the address of the array holding our password into rdx (arg2) and the address of our input into rcx (arg1). How did I figure out [rbp+272] is our input array? Remember, we passed the address of our input array to the validation function, if yes, then here comes some simple math. Nothing too fancy.
 Verifying [rbp+272] is indeed our input buffer !
So by taking above calculation as facts which isn’t (joking), we know that [rbp+272] correctly access our input array. Let’s move forward.
The Validation function compare check
Now, onto this old school function (always use strncmp): the strcmp call! It compares two strings lexicographically, which just means it checks if the strings are equal. Here’s the deal:
- If the strings are identical, it returns
0inrax, - If the first string is greater, it returns a negative value in
rax, - If the second string is greater, it returns a positive value in
rax.
But in this case, we want it to return 0 in eax (strings matched). Why? Because that will set the ZF flag after the test instruction, and then jnz (jump if not zero) will evaluate to false. This means we’ll follow the correct path, which sets 1 into [rbp+228], then moves it into eax in the instruction after the jump:
1
2
loc_1400148ED:
movzx   eax, byte ptr [rbp+100h+var_1C]
This is the value we need for the jump condition in the main function. So, let’s head there.
Coming back home to the main function
Let’s imagine the input and the string secret123 match perfectly in the validation function which will make it return 1 in eax as return value. This means the test eax, eax won’t set the ZF flag (because 1 & 1 = 1, not 0), which causes the jz to evaluate to False . This takes us down the correct path, where the magic happens - “Password correct! Access granted” shows up in the terminal. Tadaaa !

And there it is: secret123 is the password. Boom, challenge complete.
It was a nice challenge altogether. Not gonna lie, was easy as hell ! But hey, easy challenges are still satisfying. Catch you in the next one, my fellow reverser!
Challenge Link: