Part 2: Exploring Windows Internals: Processes, Threads, and More
In this blog, we’ll break down how Windows manages processes, threads, fibers, and jobs, making it easy to understand these key components and their role in system performance.
Processes: The Stage Where It All Begins
A process is a container that holds the resources needed to execute a program. It’s sometimes called an “image” because it’s essentially a copy of the program in memory.
A program is a static sequence of instructions—essentially just machine code (yep, those 1s and 0s) stored on disk. You’ve probably seen it before, like notepad.exe. If you try to open a program file in Notepad, it’ll look like gibberish because it’s not meant to be read that way. However, by using a hexdump, we can get a better idea of what’s inside. For this, there are many popular tools for this, like Hxd, but since I am more of a terminal freak, I’m going to use one I made myself, you can check it out here: Hexify. Let’s give it a try!
 Hexify: Hexdump of notepad.exe
Now let’s understand what we are seeing here:
1) 4D 5A (MZ): These are the magic bytes of a PE (Portable Executable) file. Executable files in Windows use the PE format. Magic bytes are like the file’s ID card, letting the operating system know what kind of file it’s dealing with. In this case, 4D 5A in hexadecimal translates to MZ in ASCII, which stands for Mark Zbikowski, the Microsoft engineer who designed the original MS-DOS executable format. His legacy is baked right into modern Windows executables. From the days of DOS to today, Mark’s initials live on—talk about leaving a lasting mark!
The MS-DOS header starts with a magic value, which consists of the ASCII characters “MZ”. For this reason, it’s also sometimes referred to as an MZ header.
3) As we go down, we come across the string This program cannot be run in DOS mode. This is part of the MS-DOS stub in a PE file. The stub is a small program embedded after the MS-DOS header, which meant to show this string or message if someone tries to run the executable, specifically, PE executable or binary in MS-DOS. Back in the day, this message informed users that the program required Windows to run. Even though we’re way past the DOS days, Windows still includes this stub for backward compatibility—kind of like keeping an old pager in your drawer… just in case. It’s another example of how ancient tech still haunts, er, influences, modern systems.
There’s more to PE files, but we’ll dive into that in a separate blog.
Now back to Processes, at the highest level of abstraction, a Windows process is made up of the following:
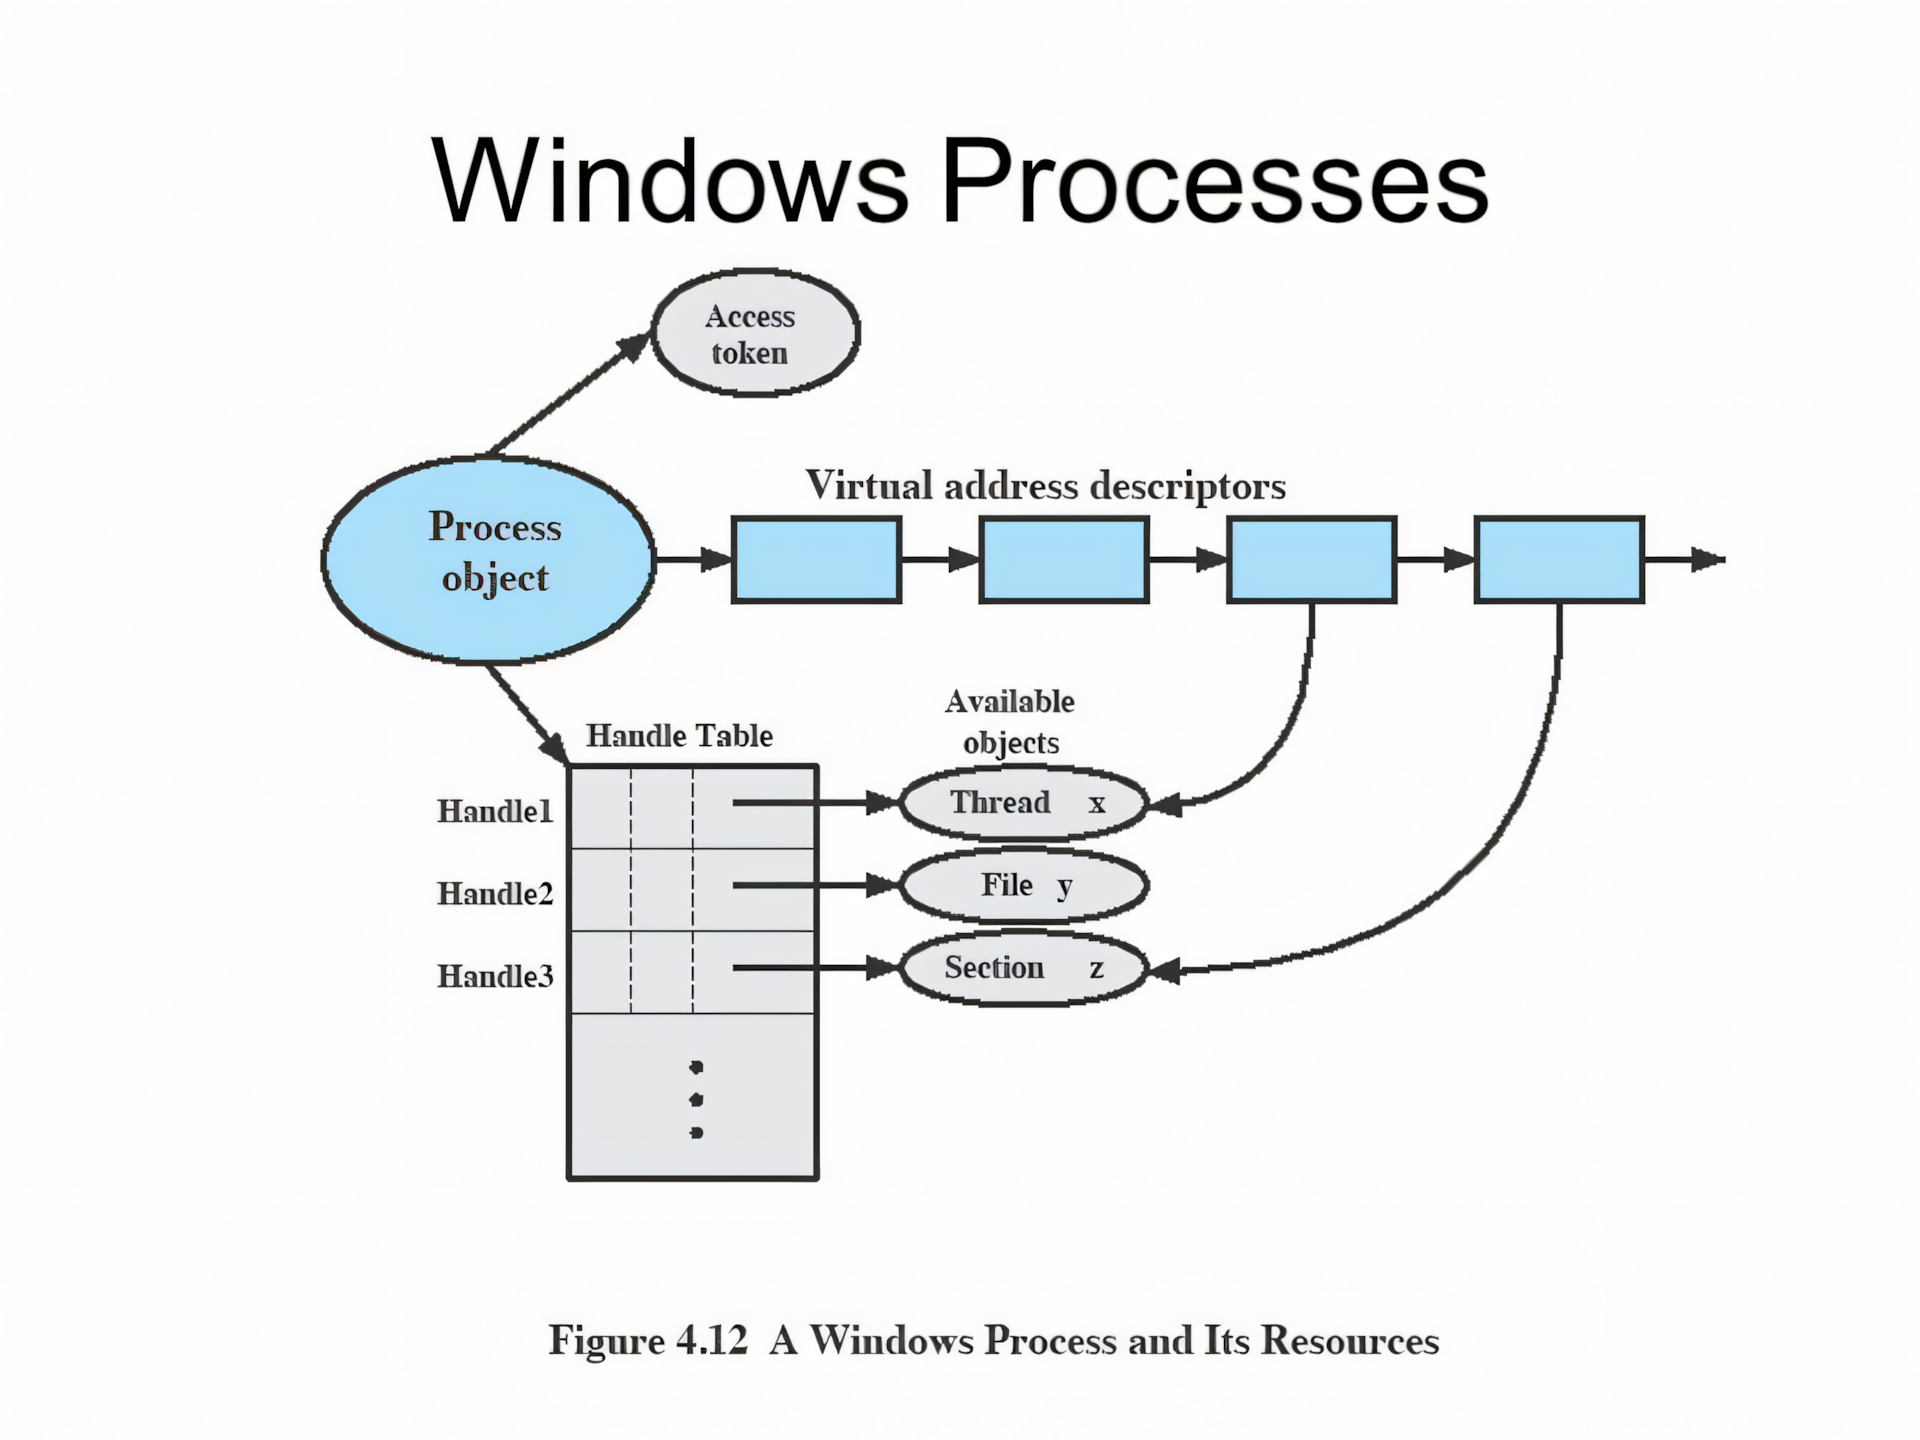 A Windows Process and Its Components
A private virtual address space: This is a dedicated chunk of virtual memory that the process can use, independent of other processes. Think of it as the process’s own sandbox, where it can play without interfering with other processes. Don’t worry about the details—virtual memory is a big topic, and we’ll explore it soon!
An executable program: This defines the initial code and data for the process. The program’s code is mapped into the virtual address space so that the CPU can execute it. This is basically the instructions and data the process needs to get started.
A list of open handles: Handles are references to system resources, like files, synchronization objects, or even other processes. All the threads in the process can access these handles, which is how the process interacts with the outside world—opening files, signaling events, etc.
A security context: Every process has a security identity, which is represented by an access token. This token includes user credentials, privileges, and security settings. It also contains details about the User Account Control (UAC) state and, if the app is sandboxed (e.g., in an AppContainer), information related to that as well.
A process ID: This is a unique identifier that distinguishes one process from another. Internally, this is part of a client ID, which is used to manage various system operations related to the process.
At least one thread of execution: Every process has at least one thread to do the actual work. Threads are the workers that execute the code within the process. Although it’s technically possible to have a process with no threads, it wouldn’t do much, since there’s nothing to execute!
Threads: The Player Within Game
In Windows, a thread is a core part of how processes execute tasks. Think of threads as the workers that get things done within a process. Here’s a straightforward breakdown of what makes up a thread and how it operates:
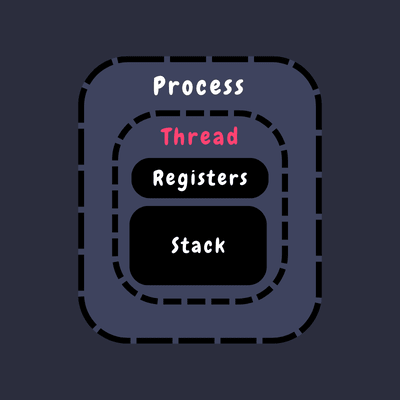 Representation of Single threaded process
- CPU Registers: Each thread maintains a set of CPU registers that represent its current state and execution context. These registers are essential for the thread to resume its tasks accurately.
- Two Stacks: Imagine a thread has two separate workspaces: one for handling system-level operations (kernel mode) and one for application-level tasks (user mode). Each stack helps the thread manage its operations and function calls efficiently.
- Thread-Local Storage (TLS): Threads have access to a private storage area known as Thread-Local Storage. It’s like a personal filing cabinet for the thread. This area is used by the thread for storing data that is unique to it, such as variables used by libraries or dynamically loaded modules.
- Thread ID: Each thread is assigned a unique identifier called a Thread ID. This ID is part of a broader identifier system known as the client ID, which also includes Process ID. Thread IDs are unique within the same process, ensuring that each thread can be individually identified.
Threads can also have a security context or token, especially in server applications where threads might need to operate under different security credentials, like assuming different roles or identities.
The volatile registers, stacks, and private storage area are called the thread’s context. This context is specific to the machine’s architecture and is managed by the operating system. You can access this context using the Windows GetThreadContext function, which provides a CONTEXT block tailored to the machine’s architecture.
Switching between threads can be resource-intensive, much like changing players in a game. To make this process smoother, Windows uses tools like fibers and user-mode scheduling (UMS), which help manage thread transitions more efficiently.
For applications that run in 32-bit mode on a 64-bit Windows system, threads will handle both 32-bit and 64-bit contexts. The Wow64 (Windows on Windows) subsystem manages these transitions, allowing applications to operate seamlessly across different modes. Most Windows API functions provide the 64-bit context by default, but you can use the Wow64GetThreadContext function to access the 32-bit context when needed.
Fibers: The Thread’s Laid-Back Cousins
You may have thought threads were the smallest unit of execution in a process—well, guess again. Welcome to the world of fibers, the even smaller, more lightweight cousin of threads! If you’re fascinated by threads, fibers will blow your mind.
Here’s how fibers work:
Unlike threads, which are managed by the Windows kernel, fibers operate entirely in user mode. They don’t get the kernel’s attention because they live within a thread, making them a smaller part of the process. So, while threads are responsible for executing tasks in a process, fibers are even more granular, sitting under a thread and running their own operations—but only when you say so.
Fibers must be manually scheduled by the application. Also, In general, fibers do not provide advantages over a well-designed multithreaded application.
To start using fibers, you convert an existing thread into a fiber with the ConvertThreadToFiber function. This is necessary because fibers don’t exist independently like threads. A thread serves as the foundation for fibers, and the ConvertThreadToFiber function essentially transforms a thread into a “fiber manager”.
1
2
3
LPVOID ConvertThreadToFiber(
  [in, optional] LPVOID lpParameter
);
Parameters:
[in] lpParameter: This is a pointer to the data that is passed to the fiber when it starts executing. When converting a thread into a fiber, this parameter is often set to NULL, as the main fiber doesn’t usually need to pass specific data to itself.
Once you’ve converted a thread into a fiber, it becomes your base for managing other fibers. With your base fiber ready, you can now use the CreateFiber function to spin up additional fibers. This gives you the power to schedule and control which fiber runs at any given time.
1
2
3
4
5
LPVOID CreateFiber(
  [in]           SIZE_T                dwStackSize,
  [in]           LPFIBER_START_ROUTINE lpStartAddress,
  [in, optional] LPVOID                lpParameter
);
Parameters
[in] dwStackSize: The initial committed size of the stack, in bytes. If this parameter is zero, the new fiber uses the default commit stack size for the executable. Generally, the linker uses 1MB.
[in] lpStartAddress: A pointer to the application-defined function to be executed by the fiber and represents the starting address of the fiber. Execution of the newly created fiber does not begin until another fiber calls the SwitchToFiber function with this address.
[in, optional] lpParameter: A pointer to a variable that is passed to the fiber. It can be pointer to your main fiber or it can be the data itself. We will see it soon.
However, fibers don’t just jump into action like threads. They need to be manually told when to start working, using the SwitchToFiber function. A fiber will run until it either finishes or switches control to another fiber.
1
2
3
void SwitchToFiber(
  [in] LPVOID lpFiber
);
Parameters:
[in] lpFiber: The address of the fiber to be scheduled. Simply put, we can use this to switch to a fiber of our choice. You see now, this is manual scheduling.
Fibers can be handy for specific tasks, but they have some drawbacks. Since they operate within a thread, they can run into problems sharing thread-local storage (TLS). Though fiber-local storage (FLS) exists to address this, it’s not a perfect solution. I/O-bound fibers can also struggle with performance, and fibers are limited to cooperative multitasking, meaning they can’t take advantage of multiple processors like threads can.
In most situations, it’s best to let Windows handle scheduling with regular threads. But for those edge cases where you need to squeeze every bit of control out of your application’s execution, fibers might just be what you’re looking for.
Let’s see an actual code:
1
2
3
4
5
6
7
8
9
10
11
12
13
14
15
16
17
18
19
20
21
22
23
24
25
26
27
28
29
30
31
32
33
34
35
36
37
38
39
40
41
42
43
44
45
46
47
48
#include <windows.h>
#include <iostream>

// The reference to the main fiber to return control back to it.
LPVOID mainFiber = NULL;

// Fiber function: does work, then switches back to the main fiber
void CALLBACK FiberFunction(LPVOID fiberData) {
    const char* message = static_cast<const char*>(fiberData);

    std::cout << message << std::endl;

    // Switch back to the main fiber after completing work
    SwitchToFiber(mainFiber);
}

int main() {
    // Convert the current thread to a fiber
    mainFiber = ConvertThreadToFiber(NULL);
    if (mainFiber == NULL) {
        std::cerr << "Failed to convert thread to fiber." << std::endl;
        return 1;
    }

    // Create two additional fibers
    LPVOID fiber1 = CreateFiber(0, FiberFunction, (LPVOID)"Running Fiber 1");
    LPVOID fiber2 = CreateFiber(0, FiberFunction, (LPVOID)"Running Fiber 2");

    if (fiber1 == NULL || fiber2 == NULL) {
        std::cerr << "Failed to create fibers." << std::endl;
        return 1;
    }

    // Manually switch to the first fiber
    std::cout << "Switching to Fiber 1..." << std::endl;
    SwitchToFiber(fiber1);  // This will execute fiber1, then return control to mainFiber

    // Manually switch to the second fiber
    std::cout << "Switching to Fiber 2..." << std::endl;
    SwitchToFiber(fiber2);  // This will execute fiber2, then return control to mainFiber

    // Cleanup fibers (best practice)
    DeleteFiber(fiber1);
    DeleteFiber(fiber2);

    std::cout << "Back to main thread fiber." << std::endl;
    return 0;
}
Save it as main.cpp and compile using:
g++ .\main.cpp -O3 -o main.exe
Run it and Output:
1
2
3
4
5
6
7
./main.exe

Switching to Fiber 1...
Running Fiber 1
Switching to Fiber 2...
Running Fiber 2
Back to main thread fiber.
Explanation:
As we’ve learned, creating fibers involves first converting a existing thread into a fiber, which then acts as a manager for other fibers. We use ConvertThreadToFiber(NULL) to convert our main thread (every program starts with at least one thread) into a fiber. We passed NULL as the argument because this parameter is a pointer to data that the fiber might need, but since we don’t need to pass any data to ourselves at this point, NULL is perfectly fine.
Now, with our main fiber in place, we create two additional fibers for demonstration purposes. Remember, our base fiber can create and manage child fibers. Everything is set up and running smoothly.
Next, we switch to the first fiber using SwitchToFiber(fiber1). This switches execution to fiber1, which runs the FiberFunction, prints “Running Fiber 1”, and then returns control to the mainFiber. We keep track of the main fiber globally with LPVOID mainFiber = NULL to save its state. This allows FiberFunction to switch back to the main fiber after it completes its task using SwitchToFiber(mainFiber). However, you don’t always have to return to the main fiber; you can directly switch to another fiber if needed.
Similarly, we switch to the second fiber using SwitchToFiber(fiber2). This fiber executes the FiberFunction, prints “Running Fiber 2”, and then switches back to the main fiber.
Note that, it’s important to clean up after ourselves. Since we’re managing the scheduling, we also need to delete the fibers when they’re no longer needed. We do this with DeleteFiber for both fibers. After cleanup, we print “Back to main thread fiber.”
You might wonder if we need to delete the main fiber as well. The answer is no, because the main fiber is just the original thread converted into a fiber, and it’s managed by the system. As for converting back to a thread, fibers don’t need to be converted back into threads, although they can’t be converted even if you want to. If you need to use threads again, you would start new threads separately.
User-mode scheduling threads
User-mode scheduling (UMS) threads, available only on 64-bit versions of Windows, combine the best of fibers and threads—without some of the drawbacks. Unlike fibers, UMS threads have their own kernel thread state, making them visible to the kernel.
Having its own kernel thread state means that a UMS thread is recognized and tracked by the operating system’s kernel. It has its own dedicated information about its status, like CPU registers, stack, execution state, which the kernel can manage.
Fibers, on the other hand, don’t have their own kernel thread state. They run entirely in user mode, and the kernel doesn’t know or care about them. They rely on the main thread (the one they run under) to manage everything. This makes fibers more lightweight but also less powerful because they can’t interact with the kernel directly for things like system calls.
This visibility means multiple UMS threads can make blocking system calls, share resources, and contend with each other as needed. Plus, UMS threads can switch between each other in user mode without involving the kernel scheduler. From the kernel’s point of view, it looks like the same kernel thread is running, so it doesn’t need to step in.
When a UMS thread needs to perform an operation that requires jumping into the kernel—like making a system call—it switches to its dedicated kernel-mode thread in what’s known as a directed context switch.
While UMS threads still can’t run concurrently on multiple processors, they operate in a more flexible, pre-emptible model, which isn’t solely reliant on cooperative multitasking like fibers. Now back to, even though each thread has its own execution context, all threads within a process share the same virtual address space. This means every thread has full read/write access to the process’s memory. But don’t worry—threads can’t just wander off into the memory space of another process unless that process allows it by sharing memory or unless the thread has the right permissions through cross-process functions like
ReadProcessMemoryandWriteProcessMemory. Processes running under the same user account generally have these permissions unless they’re inside an AppContainer or sandbox with specific protections.
In addition to a shared virtual address space, processes come with some key resources like a security context and a list of open handles to kernel objects—files, shared memory, and synchronization objects (such as mutexes, events, or semaphores). Each process’s security context is stored in an access token, which contains its security credentials and identity. By default, threads don’t have their own access token, but they can grab one if needed ! Right, we learnt that. This allows a thread to impersonate another process’s security context without affecting the other threads within the process, even across different systems on a network.
A Windows Process and Its Components
The virtual address descriptors (VADs) are data structures that the memory manager uses to keep track of the virtual addresses the process is using. Don’t worry, we will learn more about virtual memory in next blog.
Jobs
Windows has a feature called a job object, which is like an extra tool for managing processes. Instead of controlling processes one by one, a job lets you manage a group of processes together as a single unit. This is really useful when you want to set limits or apply certain rules to multiple processes at once.
For example, a job object can:
- Set limits on how much memory or CPU, the processes can use.
- Control certain behaviors (like whether they can access certain resources).
- Keep track of important information about the processes, including those that have already finished running.
In a way, the job object fills in the gap that Windows has because it doesn’t use a strict “parent-child” process structure like UNIX. But it’s actually more powerful because it gives you more control over how groups of processes behave as a whole.
Unix and Windows Process Model
UNIX Process Model:
- Parent-Child Hierarchy: When a process creates another process (using
fork()), the new process (child) is directly linked to the original one (parent). - Process Tree: Processes form a strict tree-like hierarchy. The child process inherits attributes from its parent and can be managed by the parent.
- Process Grouping: Killing or controlling a parent can affect its children.
Windows Process Model:
- No Strict Parent-Child Relationship: While a process can create another process (via
CreateProcess()), Windows doesn’t maintain a strict parent-child hierarchy. Once created, the processes are independent. - No Process Tree: Processes don’t form a structured hierarchy. A parent can’t automatically manage or control the child after creation unless explicitly programmed.
- Job Objects for Group Control: Instead of a process tree, Windows uses job objects to group and manage multiple processes together.
So far, we explored Processes, Threads, Fibers. UMS Threads, Jobs. In next blog, we will look at a great topic–the challenging realm you must traverse to witness something extraordinary: Virtual Memory.
References
- Windows Internals Seventh Edition - Part 1 by Pavel Yosifovich, Alex Ionescu, Mark E. Russinovich, and David A. Solomon.
Thank you for joining me in this blog. I look forward to seeing you in the next one! <3❤️